Protecting Rest API using OAuth2

By default, a newly generated Rest API lacks protection. This implies that accessing the Rest API won’t trigger a request for credentials such as a username and password. Simply pasting the URL directly into the browser allows immediate viewing of results.

Securing the REST API is the responsibility of developers. ORDS provides two types of OAuth for this purpose.

Two-Legged OAuth:

      • Two parties are involved in two-legged OAuth – the party calling the RESTful API (a third-party application) and the party providing the RESTful API.

      • Two-legged OAuth is typically used in server-to-server interactions. The calling server, representing the third-party application, possesses the necessary credentials securely stored to access the service. This means that the authorization is established directly between the two parties, and there is no involvement of an end-user in the process.

      • In OAuth 2.0, the two-legged flow is known as the “client credentials flow.” It is often employed in business-to-business scenarios where secure, direct communication between servers is needed.

    Three-Legged OAuth:

        • Three parties are involved in three-legged OAuth – the party calling the RESTful API (a third-party application), the party providing the RESTful API, and an end-user party who owns or manages the data accessed by the API.

        • Three-legged OAuth is used in client-to-server interactions where an end-user’s approval is required for access to the RESTful API. The process involves the third-party application, the API provider, and the end-user. The end-user must grant permission for the third-party application to access their data.

        • In OAuth 2.0, the authorization code flow and the implicit flow are examples of three-legged flows. These flows are typically employed in business-to-consumer scenarios, where user consent is a crucial aspect of granting access to their data.

      In the diagram below, I will only focusing on “Two-Legged Oauth” or the client credentials flow.

          1. Develop a REST API via Restful graphical user interface (GUI) from APEX or by using API from the database. Then register a client.
          2. Provide the client application with the client ID and client secret generated from ORDS database.
          3. Client application request for token access by passing the client id and client secret.
          4. ORDS provides access token with expiration of 60 minutes or 3600 seconds.
          5. Client application calls the REST APIs using the retrieved access token.

        Creating REST API

        Before you protect REST API, first we need to create it. Here’s the steps to follow using graphical user interface from Oracle Apex.

        1.  Enable ORDS Schema. Go to SQL Workshop tab then navigate to Restful. Choose your schema and then click the Register Schema with ORDS. You don’t need this step if you already have REST API created.
        2. A new window shows up. Make sure you toggle the “Install Sample Service” as we’ll secure one from the sample.
        3. From the sample installed, we’ll protect the oracle.example.hr module.
        4.  Create Privilege. privilege details what is secured by that privilege. When creating a privilege, you can secure either an entire module or secure based on URL patterns. In this example we will secure the REST API using the pattern /hr/*. 
        5. After the creation of the privileges, accessing the REST API would throw this error and it means that it is secured or protected.

        Create Client and Associate Privilege

        Having ensured the security of our web services, the next step is to establish a ‘Client’ and link it to specific privilege, in this case ‘Employee_Info_Priv’. We will proceed to create a client named ‘CUSTOM_APP_CLIENT.’ This Custom APP Client will utilize the employee API to access up-to-date employee information.

        				
        					BEGIN 
          OAuth.delete_client(p_name => 'CUSTOM_APP_CLIENT');
          OAuth.create_client
            ( p_name            => 'CUSTOM_APP_CLIENT', -- Name of the client application
              p_description     => 'Custom user',
              p_grant_type      => 'client_credentials',
              p_privilege_names => 'Employee_Info_Priv',  -- this can contain multiple privileges separated with comma.
              p_support_email   => 'abc@xyz.com');
          COMMIT;
        END;
        
        -- To get client id and client Secret
        select client_id,client_secret from user_ords_clients;
        
        --sample result
        T0aL5SCerkGjWufai2OpaQ.. cNnhcqBLrZ7f0GtJmGs0GQ..   


        The user_ords_clients table contains the list of client id and client secret, administator need to provide this information to the administrator of the client so they can store it to request for authorization token.

        Obtaining Access Token

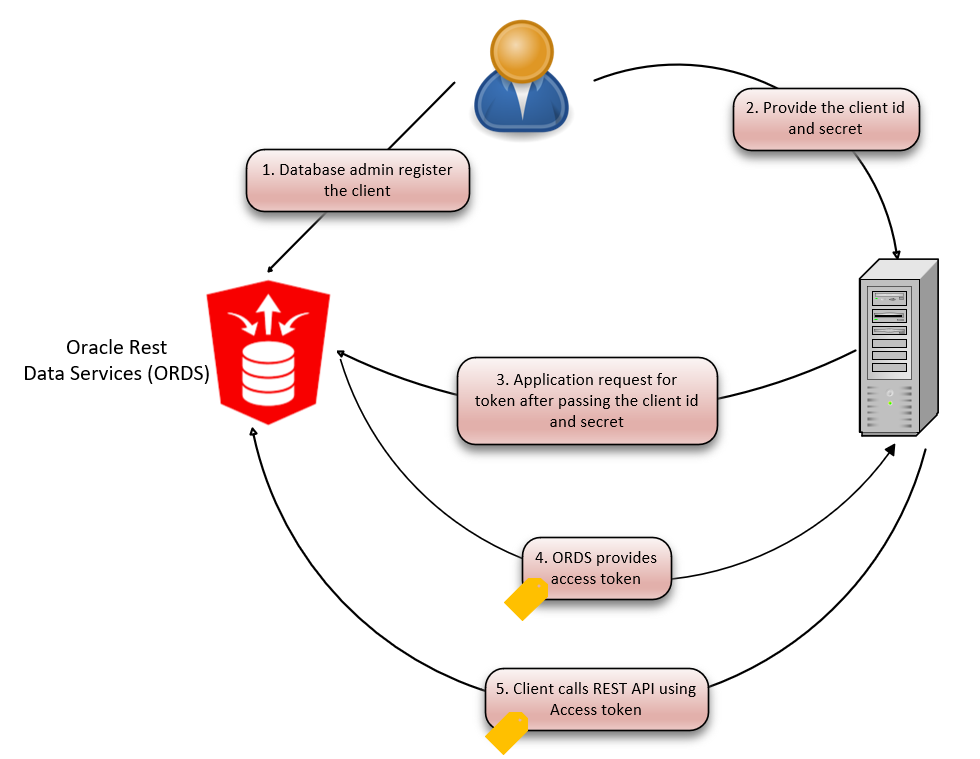
        Prior to accessing our secured service, the client application must acquire an authorization token. This involves initiating a call to a designated ORDS REST service, ‘…/oauth2/token,’ using the POST method. Illustration below using Postman.

        After obtaining the access token you can use it to access the REST API by supplying it to the Authorization and choose Bearer Token. By default, it has expiration of 3600 seconds or 60 minutes. If expired you can request another fresh token using the  ‘…/oauth2/token’.